Mastering the Valentine Scene Creator: A Practical Guide to High-Quality Digital Design
Creating compelling visual content for Valentine’s Day often feels like a race against time. Whether you are a small business owner preparing social media campaigns, a blogger curating romantic gift guides, or a hobbyist designing digital scrapbooks, the pressure to produce polished graphics can be overwhelming. This is where a specialized Valentine Scene Creator becomes an invaluable asset. However, simply downloading a kit of assets is not enough to guarantee professional results. Many creators stumble over common pitfalls regarding file management, layer organization, and licensing compliance. Understanding how to properly utilize these movable elements and PNGs can significantly elevate the quality of your work while saving you hours of editing time.
Understanding the Value of Pre-Isolated Elements
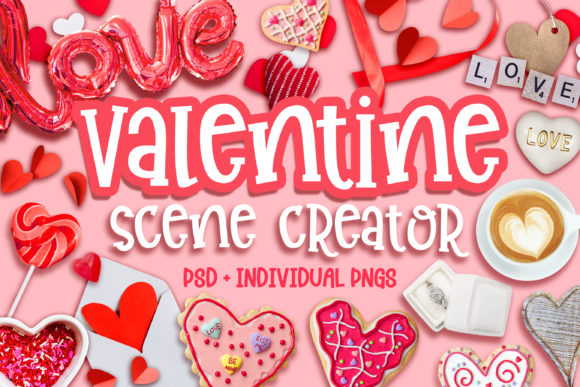
The core appeal of this specific scene creator kit lies in its preparation. The package includes an assortment of high-resolution images that have been carefully isolated. For those unfamiliar with graphic design workflows, "isolated" means the background has been removed, leaving only the subject—be it a heart, a flower, or a gift box—on a transparent background. This saves you from the tedious and often imperfect process of cutting out images yourself.
What makes this kit particularly versatile is the inclusion of two distinct folders for the 37 primary elements: one folder with PNGs without shadows and another with PNGs with shadows. This distinction is crucial for realistic composition. Beginners often overlook the importance of lighting consistency. If you place a flat, shadow-less object onto a textured background, it will look like a sticker rather than part of the scene. Conversely, using pre-rendered shadows incorrectly can make elements look like they are floating unnaturally. By having both options, you gain the flexibility to choose the right element for your specific lighting setup or to manually adjust shadows in Photoshop for a custom look.
Common Mistakes in File Selection and Workflow
One of the most frequent errors users make is ignoring the included PSD (Photoshop) files in favor of working solely with individual PNGs. While the PNGs are excellent for those without access to Adobe Photoshop or for quick drag-and-drop tasks in other software, they limit your creative control. The kit includes a PSD with all elements sized relative to each other and another with elements scaled to 100%. Ignoring these structured files means you lose the benefit of pre-established proportions.
Why this matters: When you build a scene from scratch using individual PNGs, you often struggle with perspective and scale. A rose might end up looking larger than a gift box, breaking the visual logic of the image. Using the provided PSD allows you to see how the designer intended the elements to interact. You can easily drag and drop components while maintaining correct spatial relationships. Adjusting shadows becomes a breeze because the layers are already organized, allowing you to tweak opacity or blur settings without starting from zero.
Another common misunderstanding involves the backgrounds. The zip file includes five distinct backgrounds. Some users treat these as afterthoughts, slapping elements on top without considering color harmony or texture contrast. A busy background can clash with detailed foreground elements, making the design look cluttered. A better approach is to select a background first and then choose elements that complement its tone. If the background is dark, ensure your elements have enough contrast or use the shadow-included PNGs to help them ground visually.
Navigating Licensing and Usage Rights
A critical aspect of using any digital asset kit is understanding the license. The terms for this Valentine Scene Creator are clear: do not resell any images or elements included in the scene creator. This is a standard but often violated rule. Some entrepreneurs mistakenly believe that because they purchased the kit, they own the rights to redistribute the individual PNGs or sell them as part of a new clipart pack. This is incorrect and can lead to legal issues.
Best Practice: You are free to use these elements to create end products for clients, such as social media graphics, website banners, blog headers, or printed materials like invitations and scrapbooks. The value you add comes from the composition and context you create. Always ensure that your final design is a unique arrangement. If you are creating templates for sale, check the specific extended license requirements, but generally, the raw assets must remain inaccessible to the end-user of your template.
Optimizing for Different Platforms
Creators often forget to optimize their scenes for the platform they are targeting. A high-resolution image suitable for a print mockup may be too large and slow-loading for a website or social media post. When using the movable elements, consider the final output early in the process.
- For Social Media: Use the PNGs with shadows if you are working in Canva or similar tools that do not support complex layer effects. Ensure your text is large enough to be read on mobile devices.
- For Websites and Blogs: Optimize the final JPEG or PNG export to reduce file size without sacrificing quality. The high-resolution source files allow you to scale down without pixelation, which is a significant advantage.
- For Print and Scrapbooking: Utilize the PSD files to maintain the highest possible resolution. Keep the elements at 100% scale or larger to ensure crisp edges when printed.
Technical Considerations for Non-Photoshop Users
If you do not have access to Photoshop, you might feel limited by the PSD files. However, the inclusion of the 37 PNGs in both shadowed and non-shadowed variants ensures accessibility. The key is to choose software that supports layer transparency. Programs like Affinity Photo, GIMP, or even online editors like Photopea can handle these PNGs effectively.
When working without PSDs, pay extra attention to the order of your layers. Place background elements first, followed by mid-ground items, and finally foreground details. Without the smart objects and layer styles found in Photoshop, you cannot easily edit a shadow once it is flattened into a PNG. Therefore, selecting the correct shadow variant from the start is essential. If an element looks too heavy, try using the non-shadowed version and adding a subtle drop shadow effect within your chosen software to mimic depth.
Final Checks Before Publishing
Before finalizing your Valentine’s Day graphics, take a moment to review the composition. Zoom out to view the design at a smaller size. Do the elements look balanced? Is there enough negative space to let the design breathe? Check for color consistency; ensure that the reds and pinks across different elements match in tone and saturation. Mismatched colors can make a scene look disjointed.
Additionally, verify that no important details are cut off by the frame, especially if you are adapting the design for different aspect ratios like Instagram Stories versus Pinterest pins. The flexibility of the Valentine Scene Creator allows for easy rearrangement, so do not hesitate to move elements around until the visual flow feels natural. By avoiding these common mistakes and leveraging the high-quality, isolated assets provided, you can create stunning, professional-grade visuals that capture the spirit of the holiday efficiently and effectively.